
pdf versions, lesson, figure 1, figure 2 (4 M)
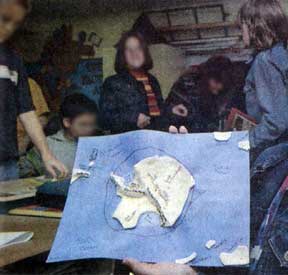 In this lesson, students create a 3-D map of Antarctica using a tortilla
and dough. It is intended to introduce students to the continent.
In this lesson, students create a 3-D map of Antarctica using a tortilla
and dough. It is intended to introduce students to the continent.
Grade levels:
specifically developed for 5-8, but easily modified for younger
students. (Modify by offering a pre-labeled work page and reduce
the number of features labeled)
Purpose:
In creating this map, students will do the following:
Science Content Standards
Materials:
Preparation:
Time:
Two 40 minute class periods
Note: Make the maps through the mountain building in the first
class period so the dough has time to dry before labeling.
Introduction:
Ask the students what they know about Antarctica. If this is the
beginning of a unit of study, you might want to record group responses
on a poster or have groups of students record their own responses.
Refer to this at the end of study to reflect on what was learned.
Tell a few interesting facts about this continent that were not
included in the student information. (See list of Interesting
Facts for ideas)
Activity:
1. Draw a reasonable
outline of Antarctica on the tortilla. The shape of Antarctica
can be related to the head of an elephant. The Antarctic Peninsula
is like the trunk. West Antarctica is like the face and East Antarctica
is like a huge ear. Another way to imagine it is as a turkey.
The peninsula is the neck, West Antarctica is the gobbler, East
Antarctica is the tail feathers. Emphasize the 3 distinct parts
of Antarctica: Antarctic Peninsula, West Antarctica, and East
Antarctica. Encourage the students to use most of the tortilla.
The end product will be about 6” from the tip of the Antarctic
Peninsula to the eastern side near the Shackleton Ice Shelf.
2. Cut out the outline shape. Keep the scrap pieces for other landforms.
3. Using scraps, cut rough shapes to resemble the southernmost parts of
South America
South Africa
Australia
New Zealand
4. Cut out islands for
Madagascar
Tasmania
Falkland Islands
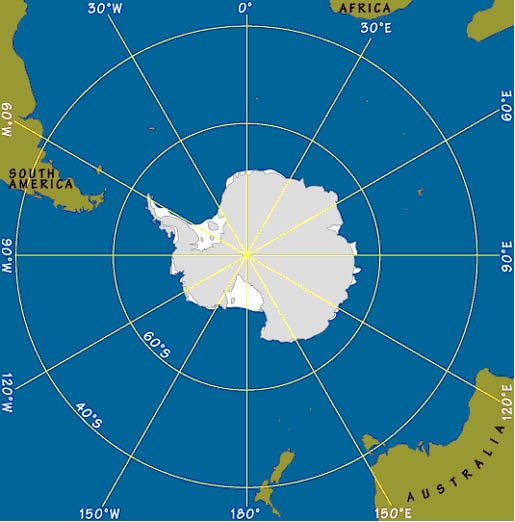
5. Set the cutout pieces on the blue paper to show relative direction and distance to each other. (See map of Global Position.) This is not intended to be done to scale, but to give an overall visual introduction to the relationship of the various parts. The smaller islands are included because they are less frequently discussed, but sometimes of higher interest than the more recognized continents.
Note: South America is about 600 miles from the tip of the peninsula with South Africa 4 times as far and Tasmania about 3 times as far.
6. Glue the pieces to the paper.
7. Label the landforms and major oceans and seas
| Chile | Tasmania |
| Argentina | New Zealand |
| Falkland Is. | Pacific Ocean |
| South Africa | Atlantic Ocean |
| Madagascar | Indian Ocean |
| Australia |
8. Build model dough mountain ranges to roughly show terrain of the continent. Label
during the second session.
Transantarctic Mountains
Ellsworth Range
Andes
9. Using chalk, color in the ice shelves.
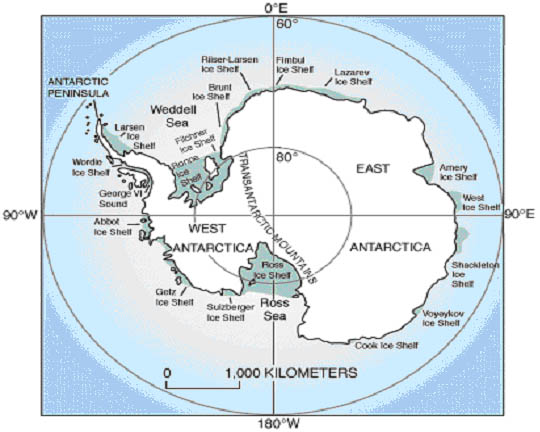
10. Label the significant areas of interest on Antarctica. (Adapt this list to match the maps you use and to include any particular items you want to emphasize.)
| Antarctic Peninsula | Mt. Erebus (12,280’) |
| Weddell Sea | Vinson Massif (16,684’) |
| Larsen Ice Shelf | Mt. Kirkpatrick (14,856’) |
| Ronne Ice Shelf | West Antarctica |
| Ross Ice Shelf | East Antarctica |
| Ross Sea | Geographic South Pole |
| McMurdo Station | Magnetic South Pole (approximate) |
11. Using a red marker, draw in the Antarctic Circle and label 66 ½ degrees South.
12. Optional: Draw in the traverse maps for the ITASE teams. This makes the map really crowded. Using a larger bulletin board map seems to give a better view of the traverse. The individual maps can be used to compare or discuss the route. (see http://www2.umaine.edu/USITASE/Proposal/images/Itaseroutemap.jpg)
Interesting Facts:
Helpful links.html:
http://www.antarctica.ac.uk/About_Antarctica/
http://www.coolantarctica.com/
http://www.antarticconnection.com/
http://astro.uchicago.edu/cara/outreach/resources/other/poles.html
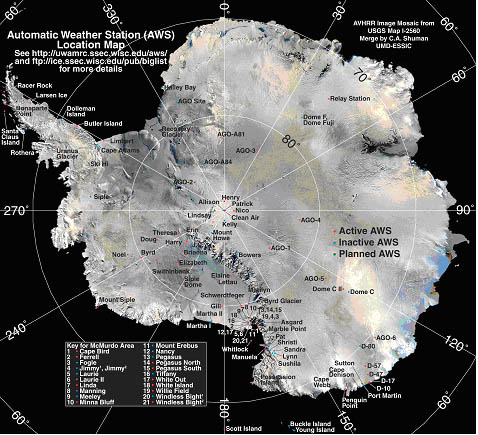
http://amrc.ssec.wisc.edu/index.html
(Click on images below to view full screen)


